Uniwits Online Reservation Service Overview
This document is a description on "Uniwits Online Reservation Service" (called the "Reservation Platform" below). This document is an introductory guide. For more detailed usages and settings, please refer to particular documents.
Due to system upgrade and detailed settings, etc, colors of screen parts in this document may be different from those in real cases. However, the operating procedure should be the same.
0. Table of Contents
- What Is Reservation Platform?
- Benefits of Using Reservation Platform
- Basic Concepts
- Participant's Guide
- Business's Guide
- Summary
1. What Is Reservation Platform?
A Reservation Platform refers to a system that users use to acquire reservations through the Internet.
There are 3 kinds of users in the Reservation Platform.
- System Administrator (Called "administrator" below);
- Individuals or businesses who use the Reservation Platform to solicit customers (Called "businesses" below);
- Users who use the Reservation Platform to obtain reservations of services produced by businesses (Called "participants" below);
Note: A user can be a business and a participant at the same time. But a business cannot reserve services of his/herself.
From viewpoint of an ordinary user, the Reservation Platform mainly involves only businesses and participants. Every service displayed in the Reservation Platform has its business, and the participant is the user his/herself. If the user is also a business, the user will also be able to use functions for businesses, without losing identity as a participant.
2. Benefits of Using Reservation Platform
The Reservation Platform works in either full-automated mode or semi-automated mode.
In full-automated mode, reservations are automatically confirmed (made formal), in the process no participation of the business is required. When a reservation happens, the system will automatically notify the business by an email. As for when to read the email is fully of the business's freedom.
Semi-automated mode is provisional reservations. After participants apply reservations, the Reservation Platform will notify the business by email, and the business confirm or refuse the application based on his/her own considerations.
For cancellations due to unilateral arrangements, the operation is also simple. Just click the "Cancel" button attached to an existent reservation to automatically cancel the reservation. There is no need for both parties to talk in phones.
By using our Reservation Platform, participants can freely make reservations without considering business hour of businesses. All reservable time are listed together so that a succinct view is available, very convenient.
For businesses, using our Reservation Platform can reduce interruption by contacts in working time, so that service quality is improved. There is no need to hire specialized employees to receive customers. All current valid reservations can be easily confirmed from the screen. No need to pay expensive fees for development of a computer system in order to serve your own needs, economic. Further more, businesses who has payment difficulties can use our system for free forever by utilizing the affiliation function.
3. Basic Concepts

In order to deploy a business, it needs five factors: business, place, room, time available, and participants. Our reservation service can help businesses manage the five factors. After registering his/her information, a business registers place, room and time available. Our Reservation Platform will automatically compute common vacant time of room and business, and show it to participants. Businesses can thus avoid the tedious work of searching for reservable time.
Relationship between a place and a room is defined by the way a seat is assigned. Rooms in the real world must exists in a place, but in the virtual world a room can distribute into more than one places. Take remote education as an example, imagine students in two or more cities gather in specified locations and receive remote education at the same time. Thus, a room involves multiple places. Hence, in the system, relationship between place and room is defined by business. A business first adds seats to a place, then adds seats to a room. When a room contains seats from multiple places, it involves multiple places.
4. Participant's Guide
4.1 Registration
When using the Reservation Platform, even if not registered, a user can still browse contents of businesses. But if reservation is to be applied, a user must first register as a user. After registration, a user can use functions for participants (such as apply for reservation).
When registering, please click the "Sign Up" menu item, (![]() ), carefully read user agreement, if agree, please click the "Agree"(
), carefully read user agreement, if agree, please click the "Agree"(![]() ) button。If not agree, the Reservation Platform will not be available.
) button。If not agree, the Reservation Platform will not be available.
Next, please enter information as a participant. please complete the table as long as possible, and click the "Confirm" button.


Then please check entered information in the confirmation screen. If no error, please click the "Register" button. If correction is needed, please click the "Revise" button.


As the screen of success is displayed, registration completes.
4.2 Log In
Please click the "Login" menu item (![]() ), enter the login name and password as you registered, and please click the "Login" button.
), enter the login name and password as you registered, and please click the "Login" button.

(In case you forgot password, please click the ![]() link and follow the instructions to reset the password.)
link and follow the instructions to reset the password.)
After logging in, participants can make reservations.
4.3 Search for Services
Please click the “Search Services” menu item (![]() ), then enter keyword and period for search. If not specified, services will be displayed in default order.
), then enter keyword and period for search. If not specified, services will be displayed in default order.

4.4 Make Reservations
Method of reservation can be classified into two categories. "Make New Reservation" and "join current schedule", respectively. After a reservation is made, the business will be notified automatically.
4.4.1 Make New Schedule (Reservation)
By business's setting, new schedules may be created by participants. There are also schedules that participants cannot create. If participants can create new schedules, "Make New Reservation" button(![]() ) will be displayed. Clicking it will enable users to create new schedules.
) will be displayed. Clicking it will enable users to create new schedules.
4.4.2 Join Current Schedule
If a service has existent schedules, and a user wish to join the schedule, the user can enter through the "Current Schedules" below the descriptive texts.

If current time is before deadline and vacant seat exists, the "Reserve" button will be displayed along with the schedule. Clicking it can join existent schedules.
4.5 Confirm Completion of Reservation
Click the "Reservation List" menu item(![]() ) to view the list of reservations.
) to view the list of reservations.

4.6 Cancel Reservation
Before deadline, participants can freely cancel reservations. There is a "Cancel" button below the schedules that can be cancelled in the reservation list above. Clicking it can cancel the reservation. The business will receive a notification automatically.
4.7 Others
Besides the functions above, the Reservation Platform still has many other function such as browse and modify user's information, internal messages, customer comment, memo, etc. Please click to have a try, or view related documents.
5. Business's Guide
Businesses can register businesses, called cousrses. Users of the Reservation Platform first register as a participant, then click "Upgrade To Business" menu item and fill in required information to become a business. A business publish a service through the following steps.
(1) Create A Place, (2) Add Seats To Place, (3) Create A Classroom, (4) Assign Seats To Classroom, (5) Create Service, (6) Assign Classroom To Room, (7) Assign Workers To Service, (8) Create Time Reservable.
If all the above information is ready, the service can be displayed. Vacant time of business and rooms are computed automatically. (Except services that are set to be unopen.)
In the following text, take opening a classroom as an example to introduce the above steps.
5.1 Basic Concepts
Service: In the Reservation Platform, a service is a template of of schedule. Deployment of a service means publish schedules and accepts reservations. E.g., deploy a consultation service for $500/hour, namely let participants able to make reservations. If a participant applies to purchase a schedule (provide consultation service at a particular time) of service (of consultation service, in this example), namely make a schedule of the service ($500/hour) from what time to what time.
Schedule: In the Reservation Platform, it means reserve particular seat of particular room during particular time interval, namely a schedule.
Reserve: Make a new reserved schedule or join an existent schedule.
5.2 Upgrade To Business
Please first register.
You can try to confirm if you have been a business, if there is a "Business Info."(![]() ) menu item in the main menu, then you have been a business. If not, there should be a "Upgrade To Business"(
) menu item in the main menu, then you have been a business. If not, there should be a "Upgrade To Business"(![]() ) menu item, clicking it and entering required information enables a user to become a business.
) menu item, clicking it and entering required information enables a user to become a business.
5.3 The Workflow For Publishing A Service
5.3.1 Register Place
When registering place, please click "Manage Place" on the "Business Info." page, then click "Create Place" in the appearing screen. Then fill information in the table like the one below and click the "Save" button.

When clicking the "![]() " icon on the search service page, information up to address will be used as reference for displaying a map.
" icon on the search service page, information up to address will be used as reference for displaying a map.
After registering a place, the place will be displayed in the "Manage Places" page.
5.3.2 Add Seats

On the "Manage Place" page, Below place information there is a button called "Manage Seats". Clicking it will invoke the following screen.

In the screen, enter number of seats to add following "Add This No. of Seats:" and click the "Add" button to add seats of specified number. Deletion of seats is done in the same screen. All seats in a place are numbered automatically.
5.3.3 Register Room
Click "Manage Room" in the "Business Info." page, then click "Add Room". Please enter name and description of the room and click "Add New". Existent rooms can be viewed in "Manage Rooms" page.
5.3.4 Assign Seats To Room
Deployment of services need be associated with rooms. Please click "Manage Seats" below room information on "Manage Room" page.

It will display the seat management screen.
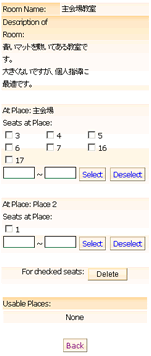
Please select the place from which you want to add seats from the "Usable Place" list and click "Add Seats".

Please check the seats that you want to select and click the "Add" button. On the "Manage Seats of Room" screen, there are numbered check boxes. These numbers are the seat numbers of the place. Seat numbers are numbers with respect to the place, or the room.
5.3.5 Register Service
Click "Manage Services" button and "Create Service" button to create a service.

After entering all the items above, please click the "Save" button to save, which will complete a service registration. Registered services will be listed on the "Manage Services" page.
5.3.6 Assign Room To Service

Click the "Assign Room" button on the Manage Services page to invoke the following screen.

Please click the "Add" button near to the room to be added to assign room.
5.3.7 Assign Workers To Service

Click the "Workers" button on the Service Manage page to invoke the following screen.
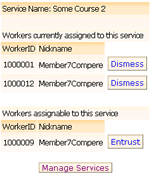
Click the "Entrust" button near the worker to entrust below "Workers assignable to this service" to assign a worker.
Multiple workers can be assigned to a single service, this case will be described separatedly.
5.3.8 Allocate Reservable Time
Workers who are assigned to a service need specify time periods, commonly in a day, that can be reserved. When only one worker is available, this would be a specification of business hours.
To assign time reservable, please click the "Business Info." menu item (![]() ) and then click "Manage Working Time".
) and then click "Manage Working Time".

If there are existent reservable time intervals, the following calendar will appear. If not, no calender will be displayed.

Click the "Add Working Time" button on top of the screen to invoke the following screen.

Please enter start time and expire time of working (reservable) period and specify "Period Status". Please set the status to "Valid", otherwise the period will not be reservable. And don't forget to check "Deliverable Services". Finally, please click the "Add" button to save the time period.
Use the above steps to specify time periods of a day. When time periods of many days are to be specified, please use the following method.
First, specify time periods of a day using the method described above. Next, on the "Manage Working Time" page, check the box near to the time periods created before, then select "Repeat" from the list at the right bottom size of the page, and click "Execute".

On the appearing page, confirm the periods being the ones you selected, and fill in the fields (date for start repitition, distance between adjacent repititions, number to repeat) below the calendar, and click the "Save" button.
![]()
5.3.9 Items To Mention
If business does not have an email set to notifiable, then its services will not be displayed.
This is an important point to note.
If such an email is not set, please click "Member Info." menu item and click "Modify" to add emails.
Next, please validate emails. If a validated email has already been set, this step can be skipped. To validate an email, please click the "Member Info." menu item, then click "Email Settings", and then the "Authenticate" button. Finally, please click the URL in the authentication email to finish email validation.
To assign notifiable email, please click "Member Info." menu item, and click "Email Setting" on the appearing screen. Select the radio button next to the email for notifications and click "Save", this will complete the email setting.
5.4 On Multiple Workers
One service can be assigned multiple workers. Please click the "Manage Team" button on the "Business Info." page, then use the appearing screen to invite team members. Please enter ID the users that you want to invite. An invitation email will be sent to invited users, it the users accepts your invitation, a new member will be added to your team.
* Team members must be comperes.
If you assign multiple members (workers) to a single service, then all the members can receive reservations of the service. A room and seats is consistent with the service, a room cannot be used by two or more service at the same time.
6 Summary
Thank you very much for using Uniwits Online Reservation Service! There are still many functions not documented in this text, please have a try!